Sunday, June 26, 2016

Plein Air to Studio Painting

Almost a month ago I started plein air painting with watercolors.  Last summer, painting outdoors had been my goal but I never got around to it. This past week I began painting en plein air with oil colors. Since then I did two paintings and made a 6.7 mile round trip hike in an attempt to do another.

Sunday June 19, Discovery Park in Seattle, WA

I made a trip back to discovery park and it is a place that has many good spots for plein air painting. I walked around for about an hour before I decided to paint the same view I had done in watercolors a week earlier. It was a cool sunny day with clouds over the Olympic Mountains.

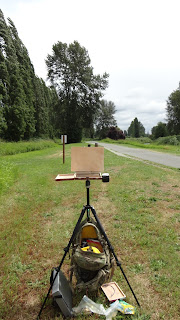
I had set up my cigar pochade box for oil painting. I made a palette using a masonite panel, two side trays (only one shown), and hooks for a jar of Walnut oil. 

I do not use solvent in my painting technique, nor to clean my brushes. I use Walnut oil for cleaning brushes while I'm painting then vegetable oil followed by soap and water at the end of painting session. I found that cleaning brushes like this extends their life. Brushes that I've had for over a year are still holding up. Then again they are Rosemary Brushes and their longevity may be based on their superb quality.


The panel I used is a 9 x 12 Raymar 1/16" Feather Lite Panel, Claessens #15 Double Oil Primed. Over the past year I have only used Alluminum Composite Panels which I prime myself. For plein air painting I decided to try the Raymar panels and I bought several sample packs.


To carry my equipment I am using a Spec Ops T.H.E. Pack which I've had for almost four years. I use this pack for hiking. I was in the Army National Guard for 6 years and I prefer military style gear. I chose this pack over my Eddie Bauer pack because I can strap the tripod to the side. New equipment also includes a Raymar Panel carrier which can hold 10 x 12 and 9 x 12 panels. I decided to stick with this size for plein air painting in oils. The Raymar Panel carrier is lightweight and is more practical than the heavier wood carriers on the market. Though it has a shoulder strap, I secured it to my pack with bungee cords. The shoulder strap is looped over my pack's top pouch and secured with the upper cinching straps. 

I painted for about two hours, starting my painting with a sketch in Roman Black Earth, followed by blocking in the darks and lights. The medium I used was Venetian Medium. The masonite palette I was using was not fully conditioned and it kept sucking the oil out of my paints. This was a real pain and I was not able to complete more of the painting than I had aimed for. At the end of the session this is what I had. I decided to complete the rest at home. 
Discovery Park, Seattle, WA, Oil on linen on MDF Panel, 9 x12

Several days later I completed the painting in the studio using photos I had taken. Yes, I know this goes against what plein air painting is all about. Most plein air painters use a loose impressionistic style but that's not where I want to go with my work. My own work is tight and can be meticulous. The landscape painters I admire most are of the Hudson River School along with modern masters like Erik Koeppel. 

Thursday June 23, Woodinville, WA

Thursday was mostly cloudy with rain coming in the afternoon. I decided to head back to Woodinville before the rain started. I wanted to paint the trees along the Sammamish River Trail as I had done on Memorial Day. This time I walked south on the trail to check it out but decided to head back north. In the future I do plan on painting a group of trees on the southern part of the trail.

I had managed to complete my sketch and blocking in of the darks. After that I started the sky and it began to rain. After painting a few minutes it looked like the rain wasn't letting up. It wasn't heavy, nor was it a misty rain. As the rain beaded up on my panel and palette I decided to head back to my vehicle. I figured that I would come back another day even though the rain only lasted 15 minutes.

When I returned home I decided I would use a photo I had taken and complete the painting. That went against my goal of painting outdoors but at least I had started the paint en plein air. This is different than the painting at Discovery Park. Even I though I completed the Discovery Park painting at home using a photo, I remembered enough about what I observed to counteract the flatness of the photo. This included remembering colors and details such as meadows that were visible on some of the closest of the Olympic Mountains. My photo was not able to show such nuances. 
Sammamish River Trail, Woodinville, WA- Work in progress

I'm almost done with this painting. I plan to darken and warm up a few areas in the trees and make the tall grass along the river stand out against the vegetation behind it. A drawback to using photos vs. observing the scene from life is that photos are flat and lack the subtleties of light in the shadows. Often the exposure is either too light or too dark. 

Within a week I will post my experiences of my first hike to do plein air painting in Washington's Cascade Range.  

Wednesday, June 15, 2016

Opening Exhibition, A/NT Gallery, Seattle Center

I have a gallery opening this Saturday, June 18 at 6:00 P.M. at A/NT Gallery's new location at the Seattle Center. This is a new space for them and the show is their inaugural exhibition at Seattle Center. I have three small still lives in the show including "Blood Oranges and Shallot"
A/NT Gallery, Seattle Center is located next to the Key Arena, West of the Fountain. For those of you in Seattle I hope to see you there!

Sunday, June 12, 2016

Cigar Box Pochades, Plein air painting, and Rublev Watercolors

A year ago my interest in landscape painting experienced a re-birth. Before that landscape rarely made it's way into my art and I didn't look at landscape painting in general. My last landscape without human figures was in Fall 1997 and it was a Bob Ross style autumn painting. Yup, I know, rather embarrassing. Though I was young and naive back then Bob Ross did help me understand how to create atmospheric perspective in oil paint. This is something I've joked about in art school when Bob Ross came up in a discussion.

Back to last year- I started to seriously study the Hudson River School painters especially Albert Bierstadt. In Seattle we have one of his masterpieces, "Puget Sound on the Pacific Coast" along with a Frederic Edwin Church. Those are the only two paintings I have easy access to. Other paintings I've studied on the internet. I also began to gain interest in British landscape painters such as Constable and Turner. My fiance and I even watched Mike Leigh's "Mr. Turner." That movie was okay, but I'm not a movie aficionado.

By the end of last June I had started a 30" x 24" painting of Mt. Rainier. The whole thing was the product of my invention, not observed from nature and it turned out somewhat stylized. I decided that if I wanted to paint a better landscape I needed to do some studies en plein air.

Cigar Box Pochades- 2015 Prototype


Before I had done any research my idea of painting plein air involved a French easel. Because I'm passionate about my materials I decided to do some research before spending any money on equipment. I learned that French easels are heavy, awkward to set up, and often not durable. I also learned that the best plein air equipment is not sold by Blick. This includes Open M, EasyL, and Alla Prima Pochade boxes.

As I was researching pochade boxes I was intrigued by the idea of building my own. There are many resources on the internet about building your own pochade box, especially ones made from cigar boxes. I decided I'd try to build one of these. I was unsuccessful in getting a box from a cigar shop because the ones that were available weren't ideal for me. Of course if I kept going to cigar shops I would have located one. Instead I found a bamboo tea box at a Salvation Army store near one of the cigar shops. Thus using the tea box I built my first pochade.


I had built it specifically for oil painting. The box has a lower compartment divided for paint and brushes. Above that is a removable masonite palette. The panel holding system is my own invention. I'm not very handy when it comes to crafting any metal related stuff. The panel holder was based on simple stuff that I could easily buy then put together. All I used were some brass bars, speed nuts, and bass wood. The brass bars are adjustable and can accommodate a panel ten inches high. Many artists like to build their pochades so that it can be used to carry wet paintings. My pochade is not able to do that and I would have to rely on a separate panel carrier. Raymar panel carriers would be my choice.

Unfortunately I never did get to any plein air painting last summer. I held myself back because I felt anxious, didn't bother to buy a sturdy tripod, and I lacked the wet panel carrier. However I did purchase a set of plein air brushes from Rosemary Brushes. I was somewhat ready but my plans to do plein air painting fizzled.

Rublev Watercolors and Plein Air Painting

As part of Scholars Atelier my students spent two weeks watercolor painting. I did a few demos for my students with the M.Graham watercolors they use. I believe that students should have access to artist grade paint rather then settle for Crayola or cheap student grade stuff. The landscapes they made turned out great. I will post these in a few weeks. 

While I was teaching my kids watercolor painting my interest in the medium was renewed. I began to think about the British watercolorists of the 18th and 19th Centuries, especially Constable and Turner. They had used watercolors for studies en plein air and Turner created some amazing work. I decided that watercolors would be a great way to ease myself into plein air painting. 

I bought a set of 12 Rublev Watercolors because I love Natural Pigment's products. Plus I like using the old school pigments which I use in oil painting. In addition to the set of 12 I purchased Chrome Yellow Primrose, Zinc White, Van Dyck Brown, Violet Hematite, Verona Green Earth, and Maya Blue. I also bought a tube of Hydrogel. I'm still trying to figure out the Hydrogel and if anyone has any suggestions please let me know. To augment my paints I purchased a selection of Rosemary Red Sable Brushes.

On Memorial Day I went to Woodinville, WA to try out my new paints in a plein air setting. It was a beautiful day and lots of people were out and about. I took my tea box pochade with me and after walking around a bit I set up on a picnic table behind Redhook Brewery, next to the Sammamish River. I was limited where to set up because I lacked a tripod. I could have sat in the grass along the Sammamish River Trail but I observed that dogs have been using it as their own personal restroom. In addition to that I saw piles of horse poop scattered about.  It wasn't exactly all over the place but I was also concerned a snake might come out of the grass along the river or at the edge of the farm fields.

After I had moved to Seattle I was intrigued by the beauty of the Lombardy Poplars that accent the landscape. Living in Virginia most of my life I had never seen the poplars. Woodinville has plenty of them near the wineries and I decided to paint the trees.

Woodinville, WA, watercolor and body color on Arches cold pressed watercolor paper, 10" x 7", 2016


Cigar Box Pochades-2016

The next day at school I brought in my tea box pochade along with the painting I did at Woodinville. I showed it to my atelier students and they thought the box was really cool. One of them wished we could make similar boxes in atelier. I told my students that if they each give me $5 I would make them a box from a cigar box. One student immediately gave me a five dollar bill. The following afternoon I went to a cigar shop in Shoreline looking for boxes. The shop had many nice usable ones. I chose these because I find the wood appealing vs. the decorative stuff. The boxes were only $2 each and I bought six.

I added the adjustable hinges to the boxes. All I need to do is add the panel holder.

Several boxes had these stickers with a 19th Century looking painting. 

I didn't notice it at the cigar shop, but one of the women in the painting had an exposed breast! It's not that bad and you'd see the same thing in an art museum. I decided to remove the stickers since my students are only 4th and 5th graders. I did tell them about it though and one student pointed out that the painting is actually all over the trim too!

My Plein Air Setup

While I was working on the boxes for my atelier students I decided to build one for myself to replace the tea pochade box. I wanted a lighter box and the larger of the cigar boxes works perfectly. It's too shallow to hold supplies and a palette while closed, but I can put my oil paints in a zip lock bag and carry my brushes in a roll. 

Today I used my kit for the first time at Seattle's Discovery Park. For my watercolors the box works out nicely. I can fit my case of 12 full pans in the box while I'm painting. Because of my panel holder I can't carry the watercolor case in there, but that's no problem. I can also secure additional pans above the watercolor case.

My two jars of water attach to my box via brass hooks I made. I used Gorilla tape to make this rig. The brass hooks lock into place when the watercolor palette is in the box.

View of the box without my watercolor block. Right now I'm using a 7 x 10 block and I also have a 9 x 12 block. They add unnecessary weight to my pack and in the future I may carry paper that's been stretched on masonite or Gatorboard. I found that I'm only doing one painting per session and I don't need a block of paper, especially two.

The tripod I use is a Manfrotto 190XB which I bought used off eBay for less than $100. The ball head attachment is a DMKFoto Heavy Duty Ball Head with Quick Release Plate. That was only $16.90 on Amazon and it feels durable to me. I didn't want to spend $50 on a ball head. I bought a Guerrilla Painter Tripod Attachment Plate which is bolted to the bottom of my box. 

Rather than use a rock bag for stability I have a carabiner attached to the tripod. I got this idea from Thomas Jefferson Kitts' Blog. My pack is suspended from the ring and if I wanted to I could put rocks in there. I'll carry a canvas tote bag for that. Also suspended from the ring is my brush case and sketch kit. This is a convenient spot for my brushes and I don't need a tray attached to my pochade box. 


Discovery Park, Seattle, WA, watercolor on Arches cold pressed watercolor paper, 7" x 10", 2016


Overall I didn't have any problems while painting. My kit was quick and easy to setup and it was stable. I plan on trying this with oils after I buy a Raymar wet panel carrier. Yesterday I bought a small masonite panel which I will fashion into a palette. 

Though I'm happy with my setup, I plan to get either an Open M or EasyL pochade box in the future. Right now my current kit allows me to get out and paint so I can hone my landscape painting skills. 

Saturday, June 11, 2016

"Willem's Kat" is going to Laguna Beach!

Yesterday afternoon I received great news that  "Willem's Kat and Pieter's Salt Cellar" has been accepted by Las Laguna Gallery in Laguna Beach, CA. It will be in their upcoming July 2016 Group Exhibition. Here's the info on their site- Upcoming Art Exhibition.


The show's opening is Thursday July 7th at 6:30 PM. If you're in the LA area check it out. The show runs from July 7 through July 30 if you can't make it opening night.

Thursday, June 9, 2016

Rublev Lead Whites Part 4- Flemish White

I'm onto number three of six Rublev Lead Whites I have used. Technical info can be found on Natural Pigment's site.

The test samples were painted on canvas toned with Orange Ochre. For the swatches painted with medium I used a low viscosity linseed oil thinned with odorless mineral spirits. This is not the medium I use in my paintings, but a common one used by most oil painters, especially beginners. To test the tinting strength I used it with Venetian Red.


Flemish White

I've had my tube of Flemish White since Spring 2014 and it's not one I use extensively. Made from tribasic lead sulfate and barite Flemish White is the warmest and most opaque of the Rublev Lead Whites. I found that it yellows more than the others. Take a look at the dried paint on this tube compared to fresh paint below.


I've noticed that it yellows within a month of drying. I had that unpleasant experience after I laid in thick highlights on one of my paintings last year. Later on I tried putting Lead White # 2 over it and that helped a little. Still I wasn't happy about the color change. 

I have no idea why Flemish White yellows like that. It's binder is walnut oil which does not yellow like linseed oil as it ages. The yellowing could be a characteristic of the tribasic lead sulfate and barite combination. In comparison Lead White # 2 is made from basic lead carbonate and I have not experienced any yellowing thus far.

Straight out of the tube Flemish White feels a bit buttery, is shorter than Lead White # 2 but peaks up as shown here. It's feel under the brush is smooth with no drag. Lead White # 2 has a bit more drag to it, somewhat like honey.

Here you can see the opacity of Flemish White. It's not as opaque as Titanium White though.

I also mentioned that Flemish White is warmer than the other lead whites. This is especially noticeable when I mixed it with Venetian Red. In addition it's greater opacity created stronger flesh tints that did not sink into the orange ochre underneath. 

Some artists like Flemish White and it's a staple on their palettes. However I do not find it as useful as Rublev's other lead whites and I've mostly used it for underpainting. For general painting it's tendency to yellow does not make it appealing to me. Overall it's strengths lie in it's opacity and warmth and this may be useful in some way if the yellowing is disregarded.